The Batch Processing dialog enables you to design your own processing sequence and create reports for each file opened. A group of files can for example be drag dropped from ImageMet Explorer or selected from the Open File Menu and process automatically. The Batch Processors automation features can be further enhanced when combined with the ActiveReporter, The Sniffer and the Plug-in Interface.
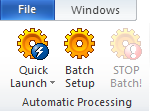
The Batch dialog is activated from the Automatic Processing panel by clicking the Batch Setup button
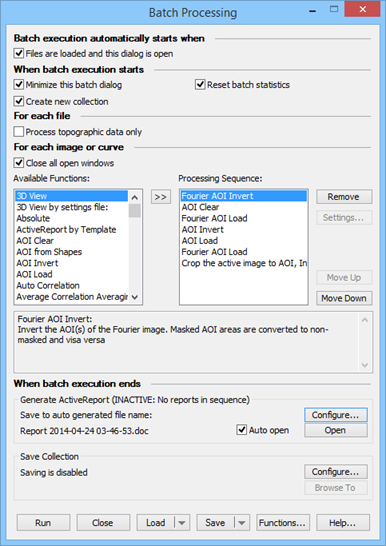
The processing sequence can be selected from the left list box by double clicking or by the add ( >> ) button. In the information box below there will be written a short description of the selected function.
The sequence order can be changed by the "Move Up/ Move Down bottoms; the top most command will be processed first.
For certain processing steps there are associated settings which can be viewed and set when the "Settings" button is active.
The colors of the selected batch process indicate possible abnormalities:
To save memory it is a good idea to delete the current windows whenever a new file is loaded; this is set by the "Close Windows Before New Loading" check box.
Setting the checkbox "Run when loading files" will cause the sequence to be performed whenever loading a new file or a group of files, but only when the batch dialog is open. To batch process a group (batch) of file just select and open them in the file open dialog or the ImageMet Explorer. For files containing more multiple channels all channels may be processed, but in cases where it is desirable only to process specific channels you can use the ImageMet Explorer for limiting the selecting to the channels of interest.
To avoid the Batch Processing Dialog to overlap the SPIP image data windows it is a good idea to set the "Minimize while processing" checkbox on.
Setting the checkbox "Reset statistics on new batch" will cause all generated statistics from, e.g. roughness and grain analysis to be reset before processing a new batch of files. In situations where the Batch Processor is running one file at a time, it might be desirable not to reset the statistics so that the statistics of a larger group of files can be reported together. Such a setup may be relevant when using the Sniffer to send files generated by your microscope to the Batch Processor whenever a new file is generated.
When setting “Process topographic data only” only images which have a length unit as z-unit and therefore considered as a topographic image will be processed. This is particular useful when processing files containing more types of images, such as phase images, which are not relevant for e.g. roughness analysis.
The Load / Save buttons allows you to save and retrieve the designed sequences. A default processing sequence can be defined by saving the settings into the Default.batch file. SPIP comes with a number of sample files, which can be loaded by the Load… button
Note, that during the batch process current defined reference parameters for calibration will be applied. You can in the corresponding menus store your preferences as the default settings, which will be loaded at program start.
The different analytical operations available in the Batch Processing menu applies mainly to the Main Image Window, but it is possible to put the image from the most recent generated window for example a gradient images into the Main Window and then process with all the optional batch operations.
When running, the information box will inform about the status of the batch process.
SPIP comes with a number of predefined batch processes all including active reports which you can use for processing and generating a report for the active data window. These batch processes are available from the Quick Launch menu together with the batch processes you have created:
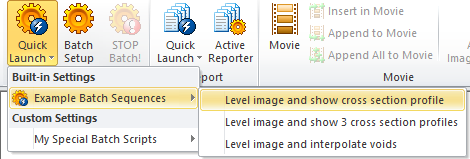
The Quick Launch tool for batch processes are therefore a convenient productivity tool for processing and reporting single data set, while the batch processor dialog is a strong tool for processing many data files and creating statistical results.
The following lists the currently available Batch Functions. To get an up-to-date li st of available functions in your version of SPIP click the “Function button.
|
Function |
Description |
Required Module |
|
|
|
|
|
3D View |
Creates a 3D view of the Main Image using the 3D default settings |
3D Visualization Studio |
|
3D View by settings file: |
Creates a 3D view of the Main Image using 3D view settings stored in a 3D settings file |
3D Visualization Studio |
|
Absolute |
Performs an Absolute function on the Main Image |
Basic |
|
Active Report by Template |
Create at report based on a selected template |
Batch Processing |
|
AOI Clear |
Clear the AOI(s) from the active Image |
Basic |
|
AOI from Shapes |
Convert Measure Shapes to AOIs |
Basic |
|
AOI Invert |
Invert the AOI(s) of the active image. Masked AOI areas are converted to non-masked and visa verse |
Basic |
|
AOI Load |
Load the AOI from file to the active Image |
Basic |
|
Auto Correlation |
Calculates the Auto-correlation image |
Basic |
|
Average Correlation Averaging |
Correlation Average using an auto selected template |
Correlation Averaging |
|
Average X-Fourier |
Calculates the average Fourier spectrum of all X-Profiles |
Basic |
|
Average X-Fourier X 8 |
Calculates the average Fourier spectrum of all X-Profiles with 8 times normal resolution |
Basic |
|
Average X-Profile |
Calculates the average X-Profile |
Basic |
|
Average Y-Profile |
Calculates the average Y-Profile |
Basic |
|
Average Y-Fourier |
Calculates the average Fourier spectrum of all Y-Profiles |
Basic |
|
Average Y-Fourier X 8 |
Calculates the average Fourier spectrum of all X-Profiles with 8 times normal resolution |
Basic |
|
Calibrate XY Accurate |
Calibrates the XY unit cell using sub-pixel Fourier transforms at the Fourier Peaks. The correction parameters are based on the current reference parameters |
Calibration |
|
Calibrate XY Fast |
Calibrates the XY unit cell using polynomial fits to the Fourier Peaks. The correction parameters based on the current reference parameters found in Processing->XY Calibration->Correction Dialog |
Calibration |
|
Calibrate XY Linearity |
Determines the Linearity, Unit Cell, and XY Correction parameters based on combined Fourier and Cross Correlation analysis. The correction parameters are based on the current reference parameters |
Calibration |
|
Calibrate Z |
Calculates the step height based on Histogram analysis. The Cz correction parameter is based on the reference parameter set in the Z-Calibration Dialog |
Calibration |
|
Calibrate Z Advanced |
Calculates the step height based on optional Averaging and Histogram analysis. The Cz correction parameter is based on the reference parameter set in the Z-Calibration Dialog |
Calibration |
|
Coarse Hysteresis Correction |
Calculates 2nd order x-,y-hysteresis functions and corrects the Main Image |
Calibration |
|
Color Brown Scale |
Applies the predefined Brown Color Scale |
Basic |
|
Color Default Scale |
Applies the user definable default Color Scale |
Basic |
|
Color Gray Scale |
Applies the predefined Gray Color Scale |
Basic |
|
Color High Contrast |
Applies the predefined High Contrast Color Scale |
Basic |
|
Color Reverse Gray |
Applies the predefined Reverse Color Scale |
Basic |
|
Cross section Profile |
Show the Cross section Profile window |
Basic |
|
Correct X,Y,Angle |
Corrects for X, Y scaling and angle error. The correction parameters are based on the actual settings, which can be from the most recent calibration performed in the processing sequence |
Calibration |
|
Correct X,Y,Angle Specific |
Correct for X,Y scaling and angle error using specific correction parameters stored in specified file |
Calibration |
|
Correct XY Linearity |
Corrects the XY Linearity by the actual 3rd order linearity model, which can be from the most recent calibration performed in the processing sequence |
Calibration |
|
Correct XY Linearity Specific |
Correct the XY Linearity by a 3rd order linearity model stored in specified file |
Calibration |
|
Correct Z |
Corrects the scaling by the actual Cz scaling factor, which can be from the most recent calibration performed in the processing sequence |
Calibration |
|
Correct Z Specific |
Z correct image using a specific correction factor stored in specified file |
Calibration |
|
Cross Section Profile with Setup |
Cross Section Profile with setup of position and cursors |
Basic |
|
Detect Lines |
Detects Parallel Line Structures / pitch, by Fourier analysis. The result is shown as a unit cell with orthogonal vectors |
Extended Fourier |
|
dy/dx Curve |
Performs a differentiation of the Most Recent created curve |
Basic |
|
Filter Specific |
Filter the image using specific filter settings stored in a File |
Filter |
|
Fine Linearity Correction... |
Performs a linearity analysis, same as "Calibrate XY Linearity" |
Calibration |
|
Force Curve Analysis |
Perform force analysis |
Force Curve Analysis |
|
Fourier |
Performs a Fourier transform of the Main Image |
Basic |
|
Fourier Curve |
Performs a Fourier transform of the Most Recent created curve |
Basic |
|
Fourier Curve X 8 |
Performs a Fourier transform of the Most Recent created curve, With 8 times resolution |
Basic |
|
Fourier Filter Specific |
Filter the image using specific Fourier filter settings stored in a File |
Extended Fourier |
|
Gradient Norm |
Calculates the Gradient Normal Image. The result is saved in a new image |
Basic |
|
Gradient X |
Calculates the X-gradient Image. The result is saved in a new image |
Basic |
|
Gradient Y |
Calculates the Y-gradient Image. The result is saved in a new image |
Basic |
|
Histogram |
Calculates the Height Distribution Histogram of the Main Image |
Basic |
|
Inspection Box |
Create an Inspection Image using the default Inspection Box size and position |
Basic |
|
Inspection Box Setup |
Inspection Box with specified position and size |
Basic |
|
Inverse Fourier |
Performs an Inverse Fourier transform of the Fourier Image |
Extended Fourier |
|
Measure Shapes |
Loads the stored Measure Shapes |
Basic |
|
Mirror X |
Mirrors the Main Image X-wise |
Basic |
|
Mirror Y |
Mirrors the Main Image Y-wise |
Basic |
|
Morphological Filtering |
Performs Erode, Dilate or Close on 2D Images |
Basic |
|
Particle & Pore Analysis Specific |
Detects Particles and/or Pores using specific settings stored in a settings file |
Particle & Pore Analysis |
|
Pixels Fewer |
Decreases the number of x,y pixels by a factor of two |
Basic |
|
Pixels More |
Increases the number of x,y pixels by a factor of two |
Basic |
|
Pixels Radix 2 |
Increases the number of x,y pixels to the nearest radix two numbers |
Basic |
|
Plane Correct |
Performs a plane correction using the current settings set in the Plane Correction Dialog |
Basic |
|
Plane Correct Specific |
Performs a plane correction using the current settings set in the Plane Correction Dialog |
Basic |
|
Plug-in |
Run a selected plug-in function |
Basic |
|
Print All |
Prints a screen dump of the SPIP program |
Basic |
|
Print Main |
Prints the Main Image to the printer |
Basic |
|
Reload Image |
Reload the unmodified image |
Basic |
|
Quadrangle Curve Fit |
Perform a quadratic curve fit |
Calibration |
|
Recall Default Correction |
Recalls the default corrections parameters saved in Default.cp. Use this when an image need to be corrected before calibration, which will define new correction parameters |
Calibration |
|
Rotate 90 degrees |
Rotate 90 degrees |
Basic |
|
Rotate Align unit cell |
Rotate so that the unit cell / line structure comes parallel to the axes |
Basic |
|
Roughness |
Calculates the Roughness Parameters. The results can be reported to HTML |
Roughness Analysis |
|
Save Screen To JPEG |
Save the SPIP Screen to JPEG using a file name based on the Main Image |
Basic |
|
Sobel |
Enhances edges by a Sobel operation on the Main Image. The result is saved in a new image |
Basic |
|
Tip Characterization |
Characterizes the tip used for scanning the main image |
Tip Characterization |
|
Tip "Deconvolute" |
"Deconvolutes" the main image with the current tip |
Tip Characterization |
|
Tip Load |
Loads a tip that can be used for "Tip Deconvolution" |
Tip Characterization |
|
Unit Cell Accurate |
Same as "Calibrate XY Accurate" |
Calibration |
|
Unit Cell Fast |
Same as "Calibrate XY Fast" |
Calibration |
|
Void Pixel Interpolate new Values |
Interpolate new values for the void pixels |
Basic |
|
Void Pixels |
Mark image values as Void pixels based on specified criteria |
Basic |
|
Window Duplicate |
Duplicates the active window |
Basic |
|
Window Duplicate Main |
Duplicates the Main Image Window |
Basic |
|
Window Close All |
Closes all SPIP windows |
Basic |
|
Window Close All Dialogs |
Closes all SPIP Dialogs |
Basic |
|
Window Close All Except Main |
Closes all SPIP windows except Main Image Window |
Basic |
|
Window Close Main |
Closes the Main Image Window |
Basic |
|
Window Close Most Recent |
Closes the most recent created window |
Basic |
|
Window Inverse FFT To Main |
Put the Inverse (Fourier Filtered) FFT Image to the Main Window for further operation |
Extended Fourier |
|
Window Most Recent Image To Main |
Put the image of the most recent created image window to the Main Window for further operation |
Basic |
|
Window Save All In ASCII |
Saves all individual images and graphs in ASCII (*.asc) format (no loss of data) |
Basic |
|
Window Save All In BCR |
Saves all individual images and graphs in BCR (*.bcr) binary format (no loss of data) |
Basic |
|
Window Save All In BMP |
Saves all individual images and graphs in BMP (*.bmp) graphics format as it appears on the screen |
Basic |
|
Window Save All In BMP 1:1 |
Saves all individual images and graphs in BMP (*.bmp) graphics format with the same number of pixels as the raw image |
Basic |
|
Window Save All In JPEG |
Saves all individual images and graphs in JPEG (*.jpg) graphics format as it appears on the screen |
Basic |
|
Window Save All In JPEG 1:1 |
Saves all individual images and graphs in JPEG (*.jpg) graphics format with the same number of pixels as the raw image |
Basic |
|
Window Save All In TIFF |
Saves all individual images and graphs in TIFF (*.tif) graphics format as it appears on the screen |
Basic |
|
Window Save All In TIFF 1:1 |
Saves all individual images and graphs in TIFF (*.tif) graphics format with the same number of pixels as the raw image |
Basic |
|
Window Save All In NanoScope |
Saves all individual images originated from a NanoScope file version 4 or higher in NanoScope (*.nsc) binary format (no loss of data) |
Basic |
|
Window Save All In Omicron SCALA Pro |
Saves all individual images in Omicron SCALA Pro format (*.par) |
Basic |
|
Window Tile |
Tiles all windows, useful for screen dumps |
Basic |
|
Window Tile 1 Column |
Tiles all windows, in one column, useful for screen dumps |
Basic |
|
Window Tile 2 Column |
Tiles all windows, in two columns, useful for screen dumps |
Basic |
|
Window Tile 3 Column |
Tiles all windows, in three columns, useful for screen dumps |
Basic |
|
Window Tile 4 Column |
Tiles all windows, in four columns, useful for screen dumps |
Basic |
|
XY Scaling |
Applies the specified distance/pixel scaling to the image |
Basic |
To set up a batch process containing MS Word or HTML reports select Active Report by Template. You will then be prompted for an existing template with extension doc, htm or html. You may see how to create a template in How to create an ActiveReporter template
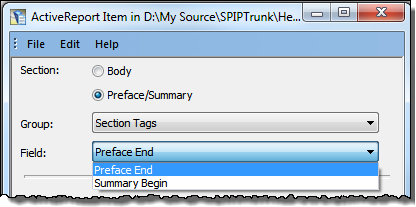
There are two ActiveReport Items dedicated for batch processing, Preface End and Summary Begin
See also the chapter on ActiveReport Items
The Preface End Tag is suitable for defining the page layout and labeling names for tabular outputs.
Summary Begin Tag
After the Summary Begin tag you may report statistical results like mean and standard deviations accumulated during a batch process.
The template area between the Preface End and the Summary Begin tags willl be processed for each data file and the final report will contain results associated with the SPIP ActiveReport items given in this section for all processed files.
If the Preface End Tag is missing SPIP the final report will not contain any preface likewise if the Summary Begin tag is missing the report will not contain any summary
When selecting a template function you will be asked to specify the template file (HTML or MS Word format). The template can hereafter be opened by use of the Settings button or exchanged by another template.
Note that it is possible to run a batch process containing nothing else as a word template because the template will instruct SPIP which processes to perform.
Use the Save Mode Combo box to select the name of the report to be generated:
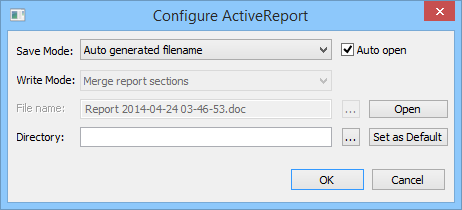
Autogenerated filename: The report will be written to a new file with a unique name. The folder for the file is selected by the "Directory" field.-
Overwrite file (prompt):The report will be written to the specified file. If it already exists it will only be generated if you confirm SPIP to do so.
Overwrite file:The report will be written to the specified file. If it already exists it will be overwritten without notification.
Append to file: The report will be appended to the specified file. If it does not exist it will be generated.
The Write Mode options are only applicable when the batch scrip contains more than one active reporter item and defines how to combine the sections defined in the template. There are two options:
This mode will merge the three sections types so that they are grouped together. In such case the summary parts will always appear at the end of the report.
This mode will append the sections such that all sections belonging to a template will stay together. In this case there will be one or more summary sections for each data set, which may be followed by a preface section for the following data set.
In the File > Open Options you may define a specific batch script to run whenever a file is opened. This is used for processing and displaying data the same way every time a data file is opened without having to activate the Batch Processing dialog. You may for example always want to have a 2D image shown next to a 3D rendered image and with profile and histogram windows shown below.
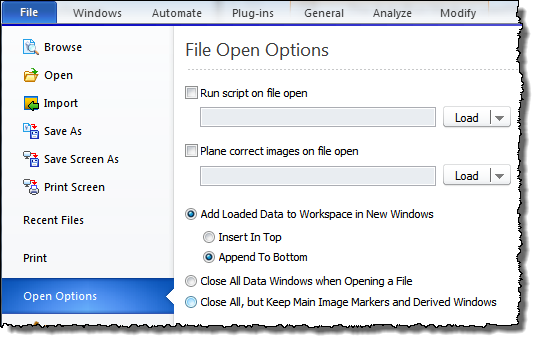
To assure that the windows will appear with certain size and position you may do the following:
Turn On Window > Auto Tile
Turn Off "Close All Data Windows when Opening a File"
Open a data file and for each of the automatically generated data windows stretch and position them as desired.
For each data window click Window > Favorite > Apply and check Window > Tiling > Use Favorite Size. You may also use the Window > Favorite > Teach for opening the Window Size dialog for adjusting the window size.
You may change the order of appearance by modifying the batch script in the Batch Processing dialog.
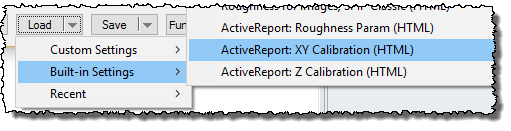
You can save and load your batch scripts and you may also take advantage or the predefined Built-in scripts.
As more advanced batch scripts may be using various settings files it is also important to provide these settings files in case you want to share it with other SPIP™ users. For this purpose you can use the Save-->Distribute function. This function will pack all used settings files along with the batch script file into a zip file. This zip file should be unpacked in the ...Documents\SPIP\Custom Settings folder to make all settings files easily accessible from SPIP™.
The big advantage of Batch Processing is the large amount of data that can be processed automatically. This also means that large amount of results can be generated. Therefore you should always make sure that you have sufficiently disk space available before activating a large batch process.
Resource leak in Windows XP SP2
There is a known error in the Windows XP Service Pack 2 operating system, which may create resource leaks such that only approximately 800 data windows can be created during a session. This error is described with at hot fix by Microsoft article Q319740
The error is related to the Windows theme interface and can be solved by turning it off. To do this, follow these steps:
Click Start, and then click Control Panel.
Click Appearance and Themes, and then click Display.
On the Themes tab of the Display Properties dialog box, click Windows Classic in the Theme list.
Click Apply, and then click OK.